|
|
||
|---|---|---|
| .. | ||
| common | ||
| configs | ||
| README.md | ||
| README.zh.md | ||
| config.py | ||
| deploy_real.py | ||
README.md
Deploy on Physical Robot
This code can deploy the trained network on physical robots. Currently supported robots include Unitree G1, H1, H1_2.
| G1 | H1 | H1_2 |
|---|---|---|
Startup Usage
python deploy_real.py {net_interface} {config_name}
net_interface: is the name of the network interface connected to the robot, such asenp3s0config_name: is the file name of the configuration file. The configuration file will be found underdeploy/deploy_real/configs/, such asg1.yaml,h1.yaml,h1_2.yaml.
Startup Process
1. Start the robot
Start the robot in the hoisting state and wait for the robot to enter zero torque mode
2. Enter the debugging mode
Make sure the robot is in zero torque mode, press the L2+R2 key combination of the remote control; the robot will enter the debugging mode, and the robot joints are in the damping state in the debugging mode.
3. Connect the robot
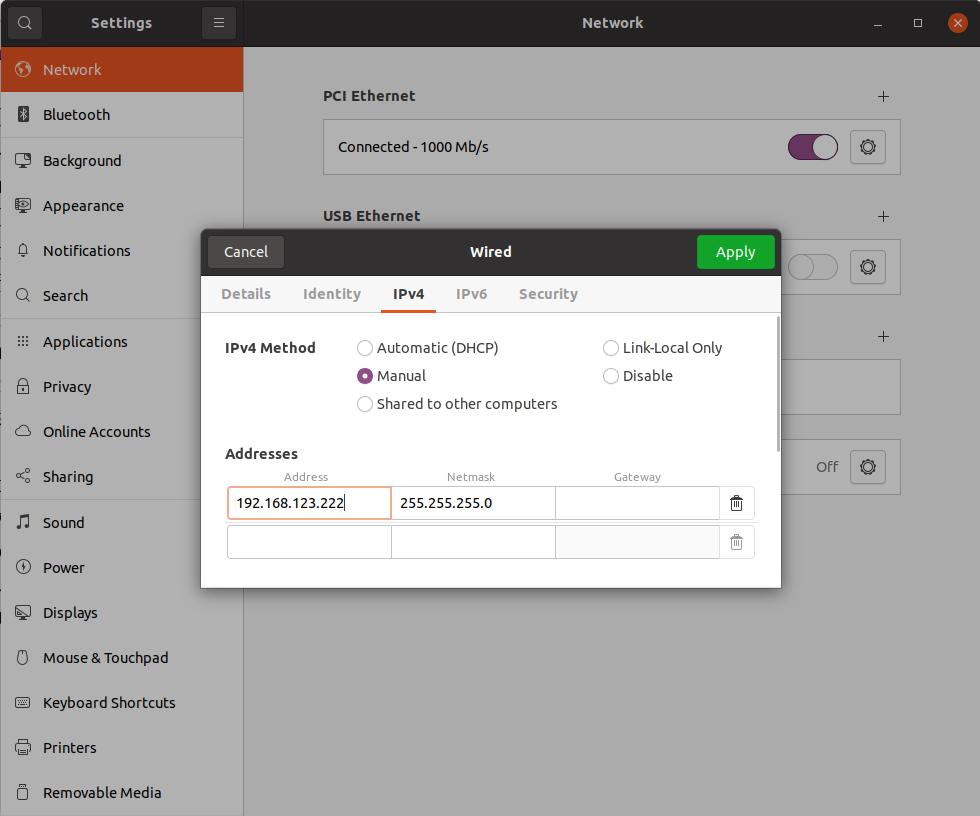
Use an Ethernet cable to connect your computer to the network port on the robot. Modify the network configuration as follows

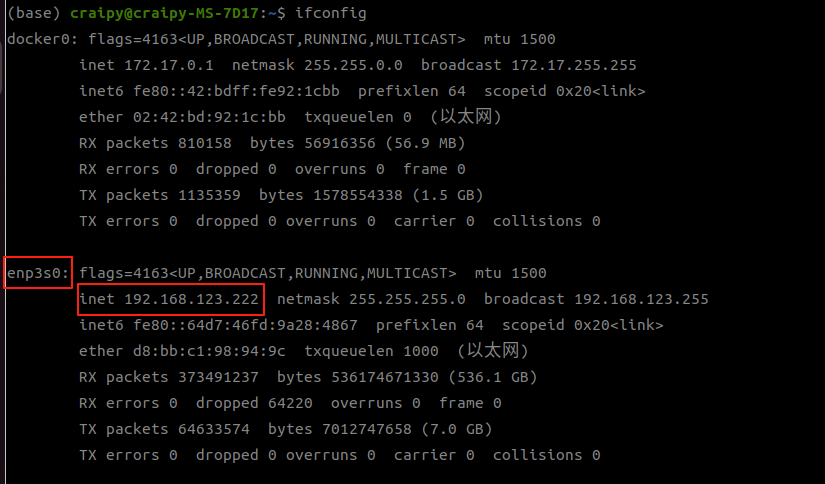
Then use the ifconfig command to view the name of the network interface connected to the robot. Record the network interface name, which will be used as a parameter of the startup command later

4. Start the program
Assume that the network card currently connected to the physical robot is named enp3s0. Take the G1 robot as an example, execute the following command to start
python deploy_real.py enp3s0 g1.yaml
4.1 Zero torque state
After starting, the robot joints will be in the zero torque state. You can shake the robot joints by hand to feel and confirm.
4.2 Default position state
In the zero torque state, press the start button on the remote control, and the robot will move to the default joint position state.
After the robot moves to the default joint position, you can slowly lower the hoisting mechanism to let the robot's feet touch the ground.
4.3 Motion control mode
After the preparation is completed, press the A button on the remote control, and the robot will step on the spot. After the robot is stable, you can gradually lower the hoisting rope to give the robot a certain amount of space to move.
At this time, you can use the joystick on the remote control to control the movement of the robot. The front and back of the left joystick controls the movement speed of the robot in the x direction The left and right of the left joystick controls the movement speed of the robot in the y direction The left and right of the right joystick controls the movement speed of the robot's yaw angle
4.4 Exit control
In motion control mode, press the select button on the remote control, the robot will enter the damping mode and fall down, and the program will exit. Or use ctrl+c in the terminal to close the program.
Note:
Since this example deployment is not a stable control program and is only used for demonstration purposes, please try not to disturb the robot during the control process. If any unexpected situation occurs during the control process, please exit the control in time to avoid danger.
Video tutorial
| G1 | H1 | H1_2 |
|---|---|---|
 |
 |
 |