|
|
||
|---|---|---|
| ZKDogApi | ||
| docs | ||
| .gitignore | ||
| LICENSE | ||
| README.md | ||
| __init__.py | ||
README.md
zkdog
这里是基于宇树科技机器狗go1二次开发相关配置经验,以及一些问题的解决方案,包括python版本的机器狗的控制api的二次封装,方便大家快速开发。
Go1系统架构图(二开)
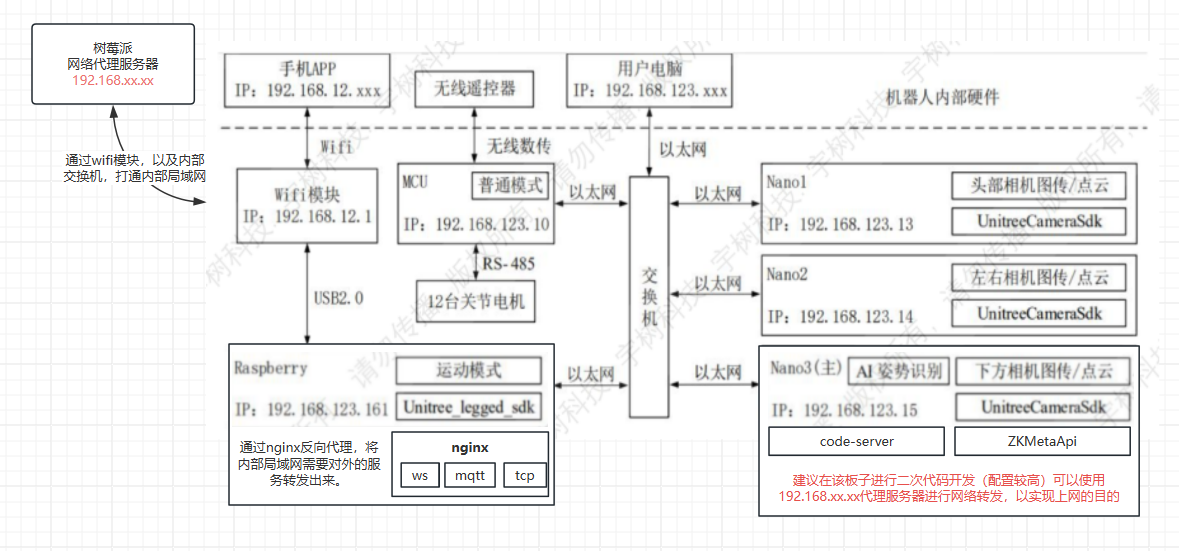
主控板:MCU(192.168.123.10)
运动控制主板:RasPi 4B(192.168.123.161)
感知主板:Nano(头部、192.168.123.13)、Nano(机身、192.168.123.14)、Nano或NX(机身、192.168.123.15)
一、基础环境配置
如何进入各个板子?
# 首先连接机器狗的wifi 密码 00000000
# 进入运动控制主板
ssh pi@192.168.12.1 # 密码 123

# 进入主控板之后,可以进入其他板子
ssh unitree@192.168.123.XX # 密码 123
1.网络环境配置
网络环境配置有两种解决办法,一种是采用官方给出的方案,采用内置无线网卡实现运动控制主板上网(弊端:其他板子无法上网)另一种则是采用有线上网的方式;这里推荐采用配置http代理的方式实现无侵入式实现所有板子上网的问题。网络配置详情。
2.开发环境配置
2.1 code-server配置
树莓派/nx 板子 arm64机器 版本不需要太高即可
code-server-3.9.3-linux-arm64.tar.gz
https://github.com/coder/code-server/releases?page=4
# 安装
tar -zxvf code-server-3.9.3-linux-arm64.tar.gz
mv code-server-3.9.3-linux-arm64 code-server

# 第一次运行生成配置
cd code-server/bin
./code-server
# 编辑配置文件
vim ~/.config/code-server/config.yaml

#bind-addr: 0.0.0.0:8888
#auth: password
#password: 123456
#cert: false

# 软链接
sudo ln -s /home/unitree/alg/code-server/bin/code-server /usr/bin/code-server

# 配置启动文件
vim code-start.sh

#! /bin/sh
su unitree -c 'export PASSWORD="123"; nohup code-server --host 0.0.0.0 --port 8888 --auth password > /home/unitree/alg/code-server.log 2>&1 &'

# 修改权限code-start.sh
sudo chmod +x code-start.sh
配置code-srever开机自启
rc.local脚本是一个ubuntu开机后会自动执行的脚本,我们可以在该脚本内添加命令行指令。该脚本位于/etc/路径下,需要root权限才能修改。
该脚本具体格式如下:
sudo vim /etc/rc.local
#!/bin/sh -e
#
# rc.local
#
# This script is executed at the end of each multiuser runlevel.
# Make sure that the script will "exit 0" on success or any other
# value on error.
#
# In order to enable or disable this script just change the execution
# bits.
#
# By default this script does nothing.

sh /home/unitree/alg/code-start.sh

exit 0
注意: 一定要将命令添加在 exit 0之前
2.2 主控板nginx 新增配置(切记不要修改内部配置)
sudo vim /etc/nginx/sites-available/default

location /codeServer {
	proxy_pass   ~~http://127.0.0.1:8080/~~ 修改为配置的 code-server 地址;
	proxy_set_header Host $host;
	proxy_set_header Upgrade $http_upgrade;
	proxy_set_header Connection upgrade;
	proxy_set_header Accept-Encoding gzip;
}

# 重启nginx服务,
sudo nginx -t && sudo nginx -s reload

# 启动之后,我们看一下 Nginx 是否处于运行状态。
sudo service nginx status
配置完成后可通过192.168.12.1/codeServer访问code-server 服务, 如果配置不生效,请检测http代理是否规避掉 需要nginx代理的ip
2.3 python 环境配置 (建议不要直接在内部python环境安装第三方包,防止冲突)
# 安装python3.6
# 下载python3.6.4

wget https://www.python.org/ftp/python/3.6.4/Python-3.6.4.tgz

# 解压
tar -zxvf Python-3.6.4.tgz

# 创建目录
sudo mkdir /home/unitree/python3.6

#编译安装(在解压出来的目录下执行)
#建议make和make install 分两步

sudo ./configure --prefix=/home/unitree/python3.6

sudo make
sudo make install

#添加软链接
sudo ln -s /home/unitree/python3.6/bin/python3.6 /usr/bin/python36

ls -al # 查看软链接

# 如果新装的python中含有pip 同上可添加软链接的形式, 否则后期pip使用可以按如下方式
# python36 -m pip list
python36 -m pip install XXX
二、ZKMetaApi 使用
1. 编译unitree_legged_sdk
git clone https://github.com/unitreerobotics/unitree_legged_sdk.git
cd unitree_legged_sdk
mkdir build && cd build
cmake .. && make
# 如果需要使用python sdk
cmake -DPYTHON_BUILD=TRUE .. && make
2. 使用python sdk
2.1 arm架构
机器狗所使用的处理器架构为arm
将example_py下的.py文件中sys.path.append('../lib/python/amd64')改为sys.path.append('../lib/python/arm64')
2.2 amd架构
PC端调试不需要更改example_py下的.py文件